Introduction
Public Oath
- The platform is accessible at app.fluidattacks.com.
- Significant changes to the user interface of the platform will be announced via the appropriate communication mechanism.
- The API is accessible at app.fluidattacks.com/api.
- A six-month notice period will be given for backward-incompatible changes in the API. This includes but is not limited to: deprecating attributes and entities, making optional arguments mandatory, changes in the authentication or authorization system, and so on.
Architecture
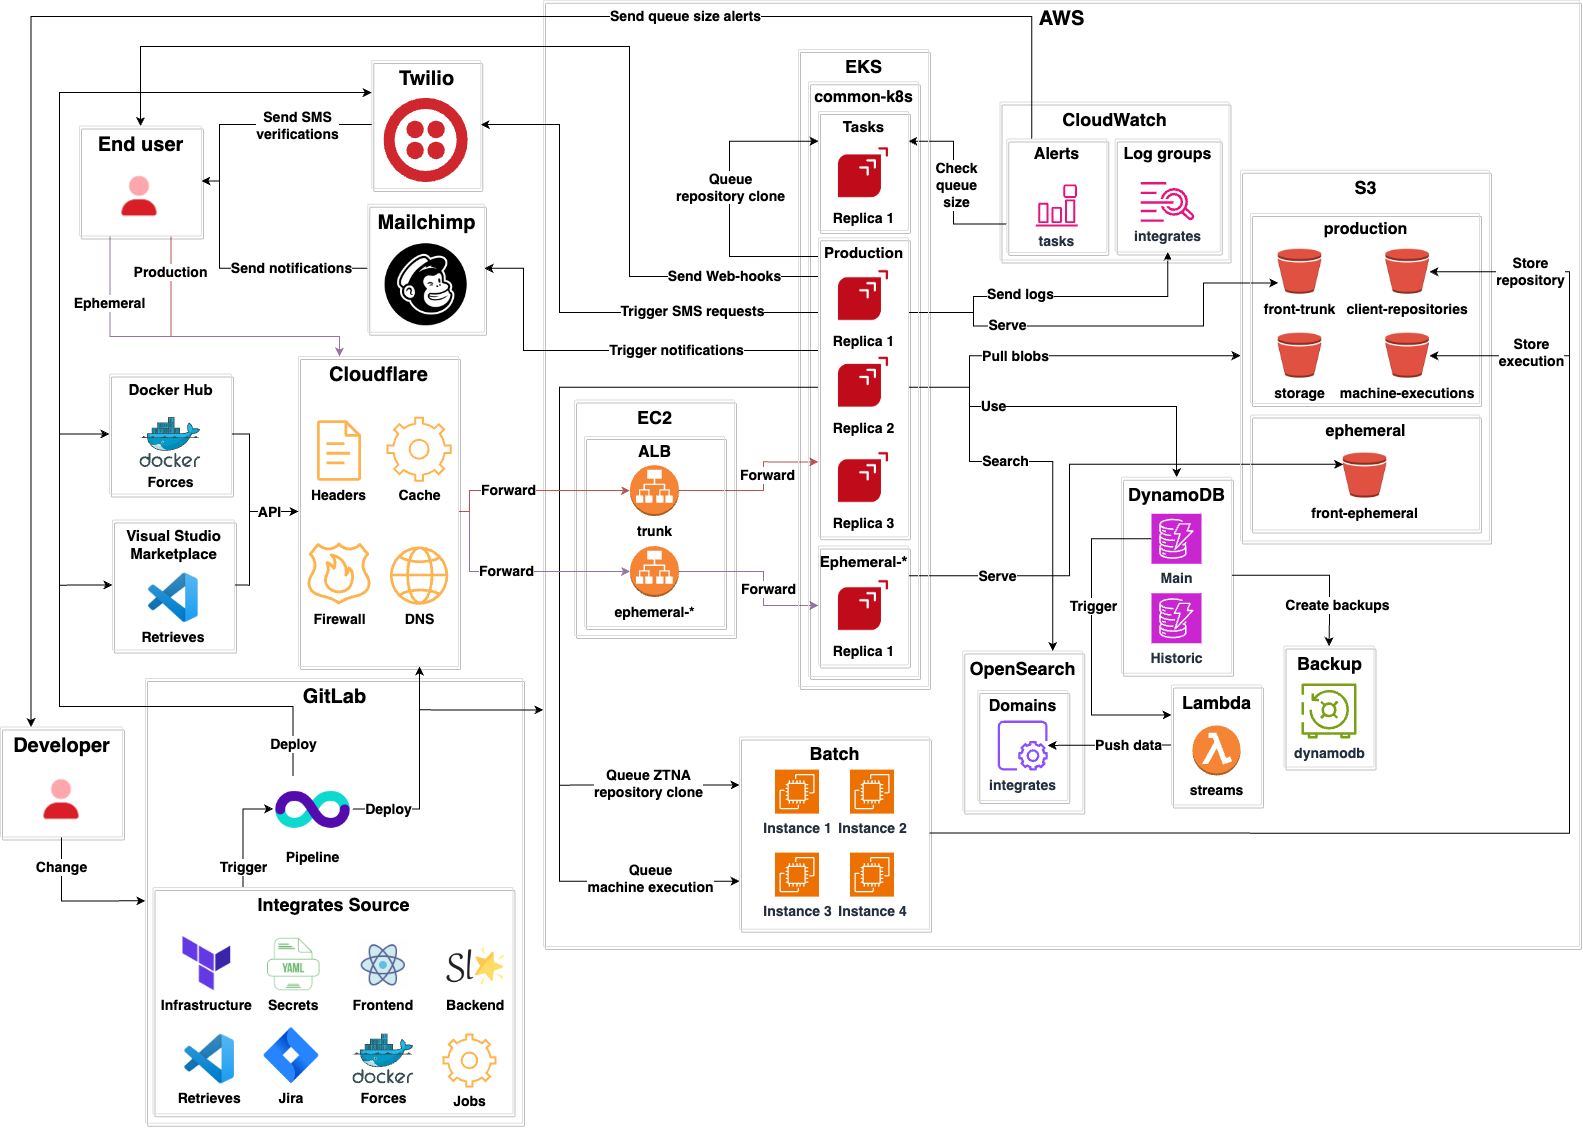
- Integrates is a standard client-server application that serves Fluid Attacks’ main API.
- It declares its own infrastructure using Terraform.
- Sensitive secrets like Cloudflare authentication tokens are stored in encrypted YAML files using Mozilla SOPS.
- It is written in typed, functional Python.
- It uses Starlette as its main framework.
- It uses Hypercorn as its web server.
- It serves a GraphQL API.
- It has three environments:
Production: The production environment used by end users.Ephemerals: A testing environment for each developer accessible via the Internet.Local: A testing environment that developers can run on their machines. Instructions for this can be found here.- There is a
Tasksapplication that performs out-of-band processing for cloning client repositories. - DNS records, cache, custom headers, redirections, and firewall for both production and ephemeral environments are managed by
Cloudflare. - A Kubernetes cluster serves:
Productionenvironment.Ephemeralsenvironments.Tasksapplication.CloudWatchis used for storing production logs.CloudWatchalerts are used to check the queue size ofTasks. If the queue size goes beyond a given limit, email alerts are sent to developers.- There is one Application Load Balancer (ALB) for
Productionand one for eachEphemeralenvironment. - DynamoDB is the main database. It has two tables:
Mainfor storing all current information.Historicfor storing historical states of entities.- OpenSearch is a secondary search database that mirrors DynamoDB. When changes occur in DynamoDB, a DynamoDB stream triggers a Lambda. Such lambda transforms the DynamoDB data to a compatible OpenSearch format and then stores it there.
- For storage, several S3 buckets are used:
client-repositoriesstores source code repositories from clients.storagestores blobs uploaded by users (evidence, example files, etc.)machine-executionsstores the results of Skims executions and provides configuration files.- The
DynamoDBdatabase is backed up usingBackupVaults by Amazon Web Services (AWS), as promised in 1 and 2. - Out-of-band processing
Jobs, like ZTNA repository cloning and machine executions are performed by AWS Batch. - It uses
Twilioto send SMS OTPs. - It uses
Sendgridto send email notifications to end users. - Webhooks are supported so end users can get machine-readable notifications to their endpoints.
Contributing
Please read the contributing page first.
Development Environment
Configure your Development Environment.
cd integrates && direnv allow
to source the environment into your shell.Local Environment
Two approaches for deploying a local environment of Integrates are described below. Either of them will launch a replica of app.fluidattacks.com and
app.fluidattacks.com/api on
localhost:8001.All in one
You can use mprocs for handling all components in a single terminal:
integrates-local.r.x.Individual components
Run each of the following commands within the
universe repository in different terminals:integrates-back-cli devDAEMON=false integrates-dbintegrates-monitorcd views && direnv allow && viewsintegrates-storageEach terminal will serve a key component of Integrates.
Accessing the local environment
- Go to
https://localhost:3000and accept the self-signed certificates offered by the server. - Go to
https://localhost:8001and, again, accept the self-signed certificates offered by the server.
This will allow the back-end to fetch the files to render the UI.
Now you should see the login portal of the application.
Ephemeral Environment
Once you upload your local changes to your remote branch in GitLab, a pipeline will begin and run some verifications on your branch.
Some of those verifications require a complete working environment to test against. This environment can be found at
https://<branch_name>.app.fluidattacks.com, and it will be available once the pipeline stage deploy-app finishes.
In order to log in to your ephemeral environment, SSO needs to be set up for it. You can write to help@fluidattacks.com with the URL of your environment so it can be configured.

Note
In case you want to deploy to your ephemeral environment back-end manually, you can run the following command:
integrates-back-deploy dev Enable SSO on Ephemeral Environments
Google
This requires you to have access to the Fluid Attacks organization on Google Cloud.
- Access the Google Cloud Console.
- Select the
Integratesproject. - In the left sidebar, go to
APIs & Services > Credentials. - On the Credentials dashboard, under
OAuth 2.0 Client IDs, choose the client ID not created by Google Services. - Finally, under
Authorized redirect URIs, add the URI of the ephemeral environment you want to enable SSO on, you want to enable SSO on:https://<branch_name>.app.fluidattacks.com/authz_google.
Azure
This requires you to have access to the Fluid Attacks organization on Microsoft Azure.
- Access the Azure Portal.
- Navigate to
Azure Active Directory(orMicrosoft Entra IDin newer versions). - In the left sidebar, choose
App registrations. - Select the appropriate app registration for
Integrates. - In the app registration overview, click on
Authenticationin the left menu. - Under
Redirect URIs, clickAdd URI. - Add the URI of the ephemeral environment you want to enable SSO on:
https://<branch_name>.app.fluidattacks.com/authz_azure. - Click
Saveto apply the changes.
BitBucket
This requires you to have access to the Fluid Attacks workspace on Atlassian/BitBucket.
- Access your BitBucket workspace settings.
- Navigate to
OAuth consumersunder theApps and featuressection. - Select the OAuth consumer configured for
Integrates. - In the consumer settings, locate the existing
Callback URLfield. - Set the callback URL to the ephemeral environment:
https://<branch_name>.app.fluidattacks.com/authz_bitbucket. - Click
Saveto update the OAuth consumer configuration.
Note
Unlike other login providers, BitBucket only supports one callback URL at a time per OAuth consumer.

Tip
Have an idea to simplify our architecture or noticed docs that could use some love? Don't hesitate to open an issue or submit improvements.