Accept vulnerabilities
The Acceptance section in Policies shows the weaknesses that your team has requested be permanently and temporarily accepted. Accepting vulnerabilities means acknowledging and tolerating their associated risks. The policies approved here apply to reports across all the groups within your organization.

Accepted vulnerabilities are ignored by Fluid Attacks's CI Gate during build checks. You assume the risk associated with allowing these vulnerabilities into production.
Accept vulnerabilities permanently
The first table in Acceptance lists the weaknesses your team has suggested for permanent acceptance, as well as the request status ('Approved', 'Rejected', 'Requested', or 'Inactive'), the request date, and any tags for classification added by the person who made it. Organization Managers can see in the Action column the options to manage permanent acceptance.

Submit a weakness to accept

Role required: User or Organization Manager
Any team member can make the approval request, but only Organization Managers can approve or reject it. To add a weakness, follow these steps:
- Click on the Add weakness button. This makes a pop-up window appear for you to select the weakness you want to submit for acceptance.
- Optionally, add one or more tags for classification.
- Click on the Request button to submit the request.

In case the request has already been made, it is displayed as unavailable, and you are informed of the request status.


Upon clicking the Request button, the weakness appears in the table with 'Requested' in the Request status column.

If you have the Organization Manager role, your submission is automatically approved.
Approve and reject acceptance requests
 Role required: Organization Manager
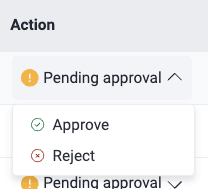
The Action column presents you with options to manage acceptance requests. Those in the 'Requested' status show you the Pending approval button. Manage them as follows:
- Approve: You approve the request, causing every vulnerability that matches the type or type-tag combination to be accepted with no additional approvals needed. This changes the request status from 'Requested' to 'Approved'.
- Reject: You reject the request. This changes its status to 'Rejected'.

Reactivate and deactivate the acceptance policy

Role required: Organization Manager
For requests whose status is 'Approved', 'Rejected' and 'Inactive', the Action column presents you with the Manage button. Manage these requests as follows:
- Click on Request to reactivate acceptance.

You have to confirm the action. Doing so changes the policy status from 'Rejected' or 'Inactive' to 'Approved'.

- Click on Deactivate to stop accepting the weakness.

Upon clicking the button, a pop-up window appears asking for confirmation. By clicking on Confirm, this policy's status changes from 'Approved' to 'Inactive'.

Add tags to classify vulnerabilities for acceptance
 Role required: User or Organization Manager
When submitting a weakness in Acceptance, you can add one or more tags to classify it. These tags are meant to help you find information fast in future searches and allow you to do analyses using categories that your team finds meaningful. For the latter, Fluid Attacks offers the analytics Tags by groups and Weaknesses by tags.
Accept vulnerabilities temporarily

Role requirements for submitting, approving, rejecting, deactivating and reactivating policies are the same as for permanent acceptance of vulnerabilities. See details above.
The second table in Acceptance shows the weaknesses your team has suggested for temporary acceptance, as well as the corresponding request status, date and tags. Additionally, Organization Managers are offered multiple options to manage requests.

A temporary acceptance policy can be created for an individual weakness or all vulnerability types:
- To submit a request for one weakness, click on Add weakness, select the weakness and click the Request button. You can optionally add tags. Bear in mind that you can only choose among the weaknesses for which a request has not been made.

- To submit a request for all weaknesses, select All vulnerability types after clicking on the Weakness field, then add tags (optional) and click on the plus button.

In this window you may select more than one weakness. Once you select at least one, you are told how many weaknesses are included in your request.
Upon clicking Request, the policy appears in the table with the 'Requested' status. Only a member with the Organization Manager role can approve or reject it.


By creating this policy, you acknowledge and temporarily tolerate the risks of all weaknesses detected in your system.

 Note: Submissions by Organization Managers are automatically approved.
Members with the Organization Manager role can manage temporary acceptance from the Action column as follows:
- Pending approval > Approve to start accepting the weakness
- Pending approval > Reject to disallow acceptance of the weakness
- Manage > Request to activate acceptance of the weakness
- Manage > Deactivate to stop accepting the weakness

Free trial
Search for vulnerabilities in your apps for free with Fluid Attacks' automated security testing! Start your 21-day free trial and discover the benefits of the Continuous Hacking Essential plan. If you prefer the Advanced plan, which includes the expertise of Fluid Attacks' hacking team, fill out this contact form.