Platform FAQ
Groups
What is a group?
A group is an independent management unit (i.e., that which has its own access permissions, reports and policies) within an organization on the platform. Each group is composed of a set of repository(s) and environment(s) of the evaluated system of which vulnerabilities to manage are reported. Ideally, a group should include all repositories that make up the system, including those containing backend, frontend, and infrastructure as code. Inside a group on the platform, there are several sections that can be accessed according to the role and plan to which you are subscribed. (For more information on groups and sections, read the page Know your group section.)
Why create several groups?
It is recommended that several separate groups, each dedicated to a specific set of repository(s) and environment(s) of the evaluated system, be created to facilitate vulnerability management. These are the benefits:
- Independent access: Access permissions are particular to each group, therefore, having multiple groups allows for a better access control. A common practice is to create a separate group for each distinct work team. Further, please note that your organization's members can belong to multiple groups and have different permissions across them.
- Independent reports: Vulnerability reports are particular to each group, which is helpful when sharing them with auditors or other third parties who might need the vulnerability management evidence regarding specific repositories and environments.
- Independent vulnerability management tracking: Analytics are generated for each group, which allows knowledge of the security status of specific repositories and environments as well as insights on the vulnerability management practices of each work team.
- Independent policies: Policies may be set at a group level so that they reflect the criticality of the assessed application and be enforced in its CI/CD process.
What is the process behind group deletion?
Group deletion is managed by Amazon Web Services (AWS), who provide the architecture for the platform. That is, when you delete a group, the platform sends the request to AWS, and they take it from there. AWS holds several internationally renowned compliance and security certifications and is therefore trusted by Fluid Attacks to securely delete client data.
Vulnerabilities
What are vulnerabilities?
Security vulnerabilities are weaknesses in IT systems that are usually the result of software bugs, design errors, or misconfigurations associated with noncompliance with cybersecurity requirements. When attackers exploit vulnerabilities, they can gain unauthorized access to and control over the system for the theft of information or other assets or the disruption of operations, among other things.
What is the difference between Age and Last report in the Vulnerabilities table?
Age refers to the number of days that have passed since the first discovery of that type of vulnerability in your software. In contrast, Last report refers to the number of days that have passed since a vulnerability of that type was last detected in your software.
How do I suggest that a reported vulnerability is a false positive?
You must select the option "Request zero risk" on the platform as the treatment for that vulnerability.
How can I see only the findings of the dynamic application security testing (DAST)?
In the Vulnerabilities table of a specific vulnerability type, you can use the search bar and type "DAST" to see only the vulnerabilities detected with this technique.
Why is the severity score in the platform lower than in external sources?
How can I see vulnerabilities specific to a particular Git repository?
In the search bar that you can find in the Vulnerabilities table, enter the nickname of the repository you are interested in, and the table will show you only the vulnerabilities reported in that repository.
Why are vulnerabilities found on very old files?
Some factors for this may be the following:
- The Continuous Hacking project started long after the software product started to be built and you decided not to do a Health Check that involves Fluid Attacks' pentesters' manual review of the old code.
- You added an old repository with code already built and the corresponding Health check was not requested.
- You requested a Health Check, which was conducted, but, as Fluid Attacks' pentesters assessing your code are changed throughout time, only now the team found these vulnerabilities.
Is the same vulnerability reported separately for production and other environments?
How does the SLA apply if I find an overlooked vulnerability in a production environment?
Why did security testing under the Essential plan fail to find vulnerabilities?
Essential is an vulnerability scanning plan, i.e., security testing is done with automated tools only. Automatic scanning has the advantages of being fast to run and very scalable. However, it has these main disadvantages:
- It only finds between 10% to 30% of the total risk exposure of a system, the rest can only be confirmed manually (e.g., through business flows that require environment, authentication, test data, etc.).
- If the scanner is configured to detect a higher percentage of vulnerabilities than described above, it starts to report more false positives than real alerts.
For these reasons, in many occasions vulnerability detection is only possible through security testing in the Advanced plan (which includes penetration testing as a service, reverse engineering and secure code review conducted by pentesters helped with tools).
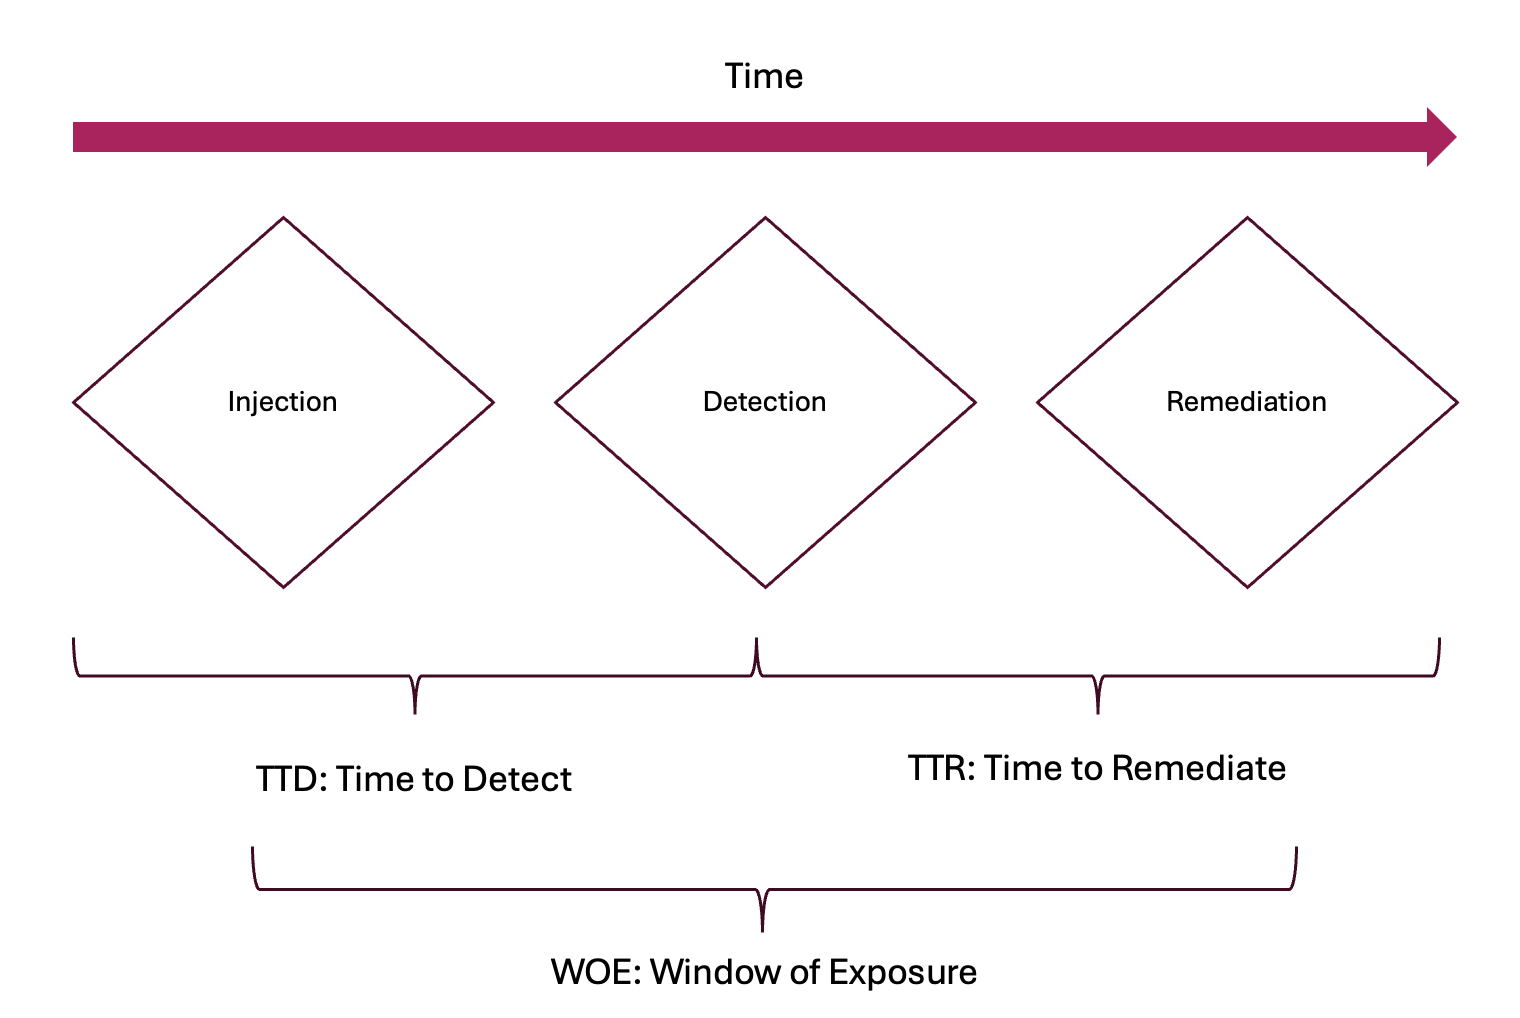
What is Fluid Attacks' time to detect?
- Automation is fast but typically detects only 20%–30% of risk exposure. This is a common industry limitation, as not all vulnerabilities can be identified automatically.
- Manual testing takes longer but ensures more comprehensive detection (available only in the Advanced plan). To optimize this process, Fluid Attacks uses AI to predict high-risk files and prioritize their review.
What influenced the duration it took to detect the vulnerability?
- Lack of a Health Check in applications with prior development
- Testing in the wrong branch or environment, resulting in accumulated changes and delayed commits to Fluid Attacks
- Missing key resources, such as credentials or permissions, delaying test execution
- Vulnerabilities are zero days in third-party software only just disclosed (continuous testing of applications is crucial to identify these threats as soon as they emerge)
- Sometimes human error can cause delays (Fluid Attacks mitigates this using an AI tool that helps its experts prioritize high-risk files, rotating pentester teams for varied reviews, and having dedicated teams to discard potential false positives and search deeper to reduce false negatives)
How to evaluate the suitability of a security provider?
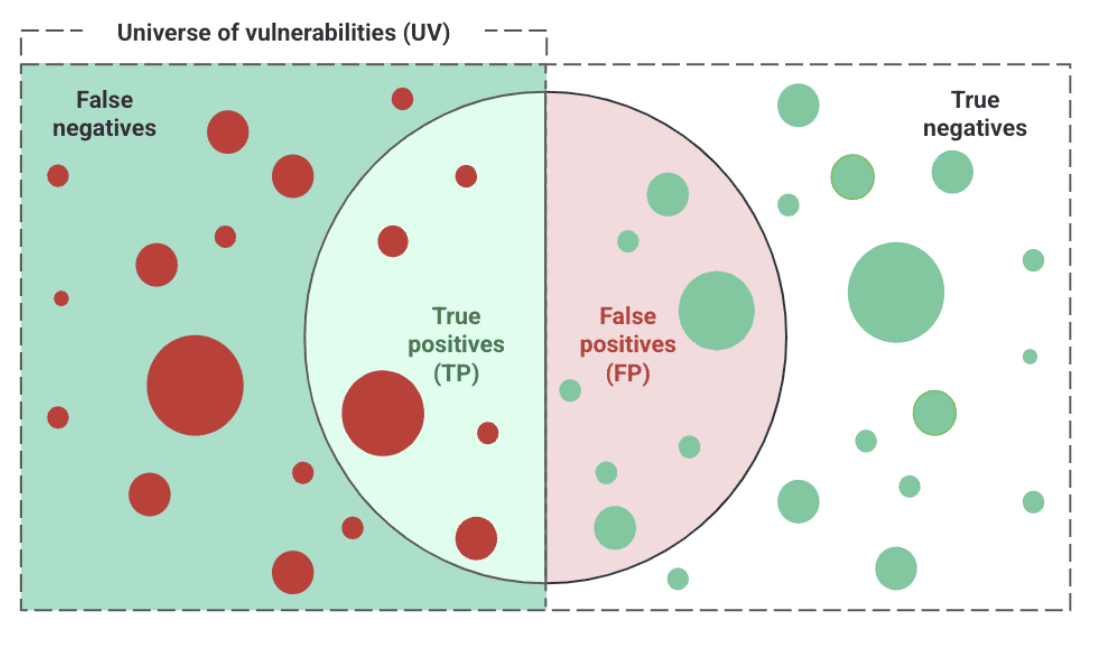
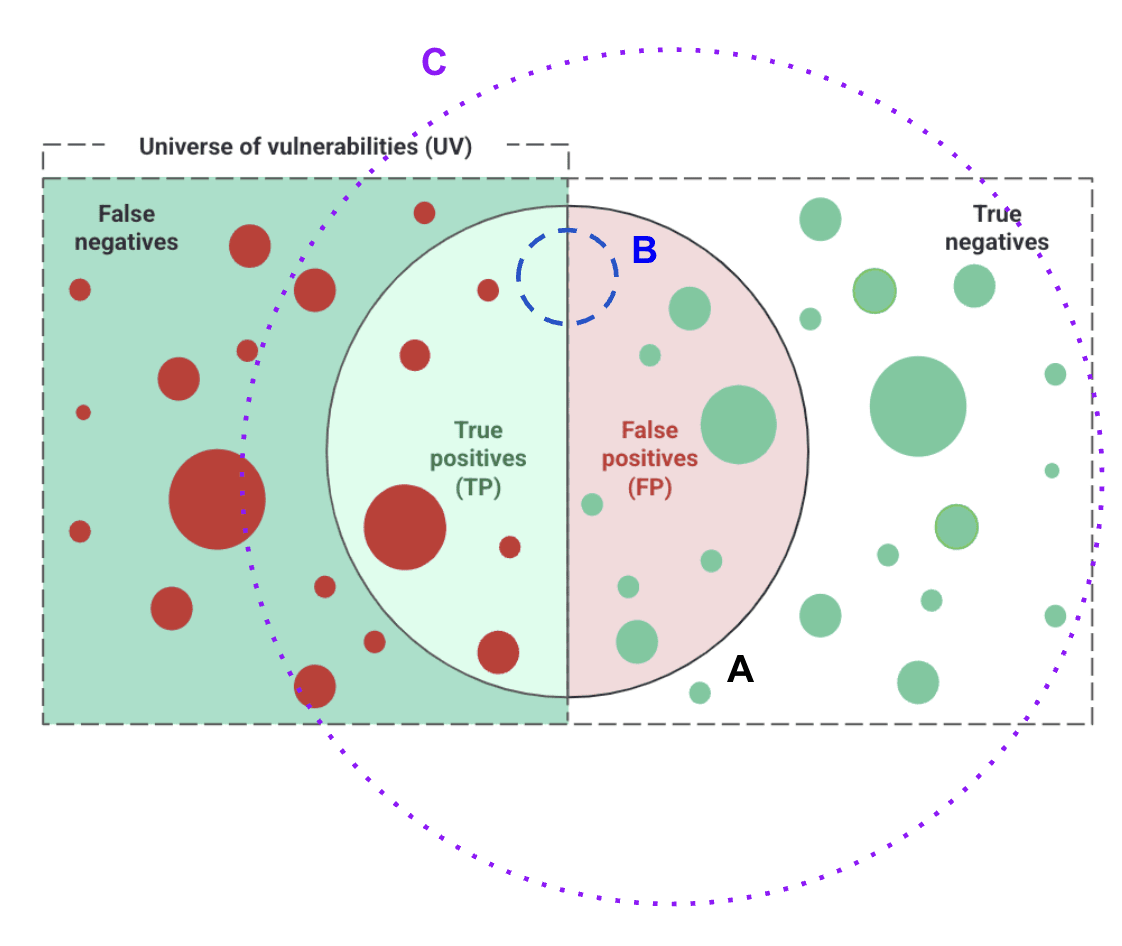
- Precision = TP / (TP + FP)
- Recall = TP / (TP + FN)
Does Fluid Attacks explain how to remediate a vulnerability?
For vulnerability remediation details, Fluid Attacks has a feature in its IDE extension and in its platform that allows generative artificial intelligence to create remediation guides that show developers the steps for remediation alternatives. These guides are not guaranteed to be precise and require validation by a developer having the system's context in mind. Considering these guides is, however, an excellent starting point to start remediating issues. No one at Fluid Attacks is authorized to give remediation recommendations. Advanced plan users do have an exclusive help option whereby they can talk to one of Fluid Attacks' pentesters about the detected vulnerabilities.
Can I have detailed conversations with someone at Fluid Attacks about the detected vulnerabilities?
Evidence
How many pieces of evidence (images and videos) do I have access to?
There is a limit of six files (images or videos). However, these are constantly updated according to the reattacks or new vulnerabilities that may be reported.
Scope
What is a nickname?
A nickname is a term a team gives to a repository or set of credentials to make it easier to find or identify.
Where can I find my repository's nickname?
You can find it in the Git Repositories table in the Scope section.
What is included in the scope of Continuous Hacking, and what is not?
- Fluid Attacks has access to the repository and branch where the vulnerability is present before the corresponding vulnerable code was written.
- Fluid Attacks has access to the repository and branch where the vulnerability is present after the corresponding vulnerable code was written, and Continuous Hacking is requested.
- An environment is registered, but its source code is not.
- An environment is registered, but it does not correspond to the registered source code.
- A vulnerable service is consumed insecurely, and the service is not registered with its source code, but the consumer is.
How many branches does Fluid Attacks test?
How many environments does Fluid Attacks test?
Can security testing to production environments affect their availability?
Are production environments only tested to verify vulnerabilities in pre-production ones?
Why test production environments if QA can be tested instead?
Can I remove a repository from the platform?
The deactivation functionality allows you to effectively remove the repository clone, stop testing by Fluid Attacks in that repository, and mark its 'Open' vulnerabilities as 'Closed'. This approach satisfies both your need to manage vulnerabilities with Fluid Attacks in selected repositories and the platform's requirement to maintain a complete and secure history.
Does Fluid Attacks test the security of email servers?
Does Fluid Attacks test low-code applications?
Reattacks
How many hours do I have to wait for a response to a reattack request?
The maximum time you would have to wait would be 16 office hours, according to our service-level agreement.
How do I request a reattack?
You can request a reattack from the Vulnerabilities and To-do sections. Select the vulnerability to be reevaluated and click the Reattack button. Then, the chosen vulnerability will show the "Requested" status in the Reattack column for up to 16 hours. Remember to check the Comments section for any new comments on the reattack.
How do I know that a requested reattack is in progress?
You must verify that the Reattack column in the Vulnerabilities section shows the "Requested" status for the vulnerability you wish to be reevaluated. You can also check in the Comments section whether there are comments on the request.
I am unable to request a reattack; why?
The most common reason is that the repository is not synchronized. See the Scope section to verify there were no errors when cloning the Git repositories.
Another reason may be that you are trying to request a reattack for a vulnerability reported by our tool when, in fact, you have not made any new changes to your repository. That is, the last commit analyzed by the tool is the last one from your repository. So, if you were to run the reattack, the results would be the same. Therefore, you should first try to remediate the vulnerability in your repository.
If you continue having problems with the reattack request after applying the above, please get in touch with us at help@fluidattacks.com.
Security testing certificates
How do I generate a service certificate?
In the Vulnerabilities section, click the Generate report button and select the Certificate option. However, this option will not be available if you have not filled out the Business Registration Number and Business Name fields in the Information section. Remember that the roles that can download certifications are User Manager and Vulnerability Manager.
Reports
How do I generate the vulnerability report?
In the Vulnerability section, click the Generate report button and select which type of report you want to download, either technical or executive. Remember that you must register your mobile number beforehand to enable two-factor authentication to download the report. The roles that can download reports are User Manager and Vulnerability Manager.
What is the difference between executive and technical reports?
The executive report is a summary report in PDF format generally intended for personnel in management roles. This report contains concise and clear information on the vulnerabilities reported in the group. On the other hand, the technical report is an XLSX file where you have all the vulnerabilities reported in the group with their technical details.
What security requirements does Fluid Attacks verify?
Members
What is the difference between members and authors?
Members refer to all users who can access your group to visualize information or manage vulnerabilities, scope and tags, among other things. Authors are all the developers, professionals, or bots who contribute to the repositories under evaluation.
Comments
What is the difference between the two comment alternatives?
Comments is one of Fluid Attacks' communication channels with users. You can find it in the Vulnerabilities and Events sections. Use the Vulnerabilities one when you have questions regarding a specific vulnerability. And use the Events one to ask about the status or details of situations that prevent security testing from resuming.
Treatments
Why does a vulnerability status still appear as "Vulnerable" when I have permanently accepted it?
When you permanently accept a vulnerability, your organization assumes the risk of not remediating it, but this does not mean the vulnerability no longer exists or that your software is now free of it.
What happens when a temporary acceptance treatment expires?
In such a case, the treatment for the security issue in question is again shown as "Untreated" and the remediation is assigned to the user who requested the temporary acceptance.
Policies
If I apply policies to a group, will these apply to all its repos?
Yes, group policies will apply to all repositories added to that group.
What is the difference between policy at the organization level and the group level?
Organization policies are those that you establish globally and are inherited by all groups belonging to an organization. Group-level policies, on the other hand, allow you to set variations on the above policies for specific groups.
CI Gate
Must I only install Docker to run the CI Gate from my local machine?
Yes. For more information, please read Install CI Gate to break the build.
Does Fluid Attacks' CI Gate run locally or on the development infrastructure?
You can run it both ways.
Is Internet connection required for using the CI Gate?
How many arguments can I pass to run Fluid Attacks' CI Gate?
You can pass multiple arguments.
How often is it advisable to do "docker pull" to update the image?
It is up to you to do it weekly or monthly.
In what mode can Fluid Attacks’ agent be run so it doesn't break the build?
In "lax mode," opposite to "strict mode."
Must all team members use the same token to run the CI Gate in a group?
Yes. To acquire the token, go to the CI Gate section in Scope.
Do CI Gate executions fail in the case of service unavailability?
Platform problems
What can I do if I do not see information when I enter the groups?
Please log out of the platform, delete your browser's cache and cookies, log back in, and enter the groups with the inconvenience.
What can I do if I cannot access the platform?
